Your water has suddenly stopped.
Panic sets in as you imagine life without showers or laundry.
A simple reset, however, might be the only fix you need.
To reset a well pump, first find the pressure switch, a small grey box near the pressure tank. Locate the small silver reset lever on its side. You must hold this lever in the "START" position until your pressure gauge reads above 40 PSI, then release it to "AUTO."
Before you assume the worst and call for an expensive repair, you should understand the reset process.
This is your first and most powerful line of defense against a water outage.
But what happens if a simple reset doesn't solve the problem?
It is important to work through the issue methodically.
This guide will walk you through everything, from basic resets and diagnostics to understanding the advanced technology in modern pumps.
Let's get your water flowing again.
Instructions to Reset Low Water Cut Off Pressure Switch
The pump won't start after a power outage.
You need water now.
A manual reset is often the quick and effective fix you are looking for.
Find the small grey pressure switch box, typically mounted on the piping near your pressure tank. Move the 1-inch silver lever on its side up to the "START" position and hold it. Release the lever back to the "AUTO" position only after the pressure gauge climbs past 40 PSI.
The reset procedure is designed to be straightforward, but understanding each component is crucial for success.
A low water cut-off switch is a safety device.
Its primary job is to protect your submersible pump from destroying itself.
If the water level in your well drops below the pump, running it dry would cause the motor to overheat and fail within minutes.
This failure is catastrophic and expensive.
The switch prevents this by shutting the pump off.
A Step-by-Step Guide to the Reset Lever
Following these steps precisely ensures you perform the reset correctly.
- Locate the pressure switch. It is a small grey box, usually about 3.5 by 2.5 inches. You will find it attached to the piping at the pressure tank.
- Locate the reset lever. This is a small, silver-colored lever, approximately 1 inch long, located on the side of the switch.
- Check the current position. The lever should normally be in the "AUTO" position, which is pointing down. The labels AUTO, START, and OFF are marked on the switch casing.
- Check the pressure gauge. This round dial indicator is also near the switch. If the pump has shut off, the gauge should read zero or a very low pressure.
- Initiate the reset. Move the lever up into the "START" position. You must hold it there. You should hear the sound of water beginning to fill the pressure tank.
- Build pressure. Continue holding the lever in the "START" position. Watch the pressure gauge. Do not release the lever until the pressure reads over 40 PSI.
- Return to automatic operation. Once you reach 40 PSI, release the lever. It should spring back to the "AUTO" position. The pump will now run on its own until it reaches its cut-off pressure, which is typically 50 or 60 PSI.
What to Do If the Reset Fails
If you perform the reset sequence and the pump still will not start, do not keep trying.
The safety switch is doing its job.
This indicates a more serious underlying issue that a simple reset cannot fix.
There could be other factors at play.
The water level in the well may be too low for the pump to draw water safely.
There could be an electrical fault in the wiring or the pump motor itself.
In this situation, forcing the pump to run would likely cause severe damage.
A professional diagnosis is required to identify the root cause.
Trying to bypass the safety switch can turn a simple service call into a full pump replacement, a cost that is often 80-90% higher.
DIAGNOSING THE PROBLEM BEFORE YOU FIX A WELL PUMP
Your pump reset did not work.
Perhaps the problem came back a few hours later.
Do not immediately assume your pump is broken.
The pump itself is often the last component to fail.
Most "pump failures" are not pump problems at all. Research shows over 60% of service calls are for simple electrical issues like a tripped breaker. Faulty pressure tanks and switches cause the vast majority of the remaining well system issues.
Think of yourself as a detective.
Your goal is to rule out the simple and common culprits before concluding you have a major problem.
This methodical approach saves time, money, and unnecessary stress.
The pump motor is a durable piece of equipment.
The components that control it, however, are more prone to failure.
The Detective's Checklist: Symptoms and Causes
Each symptom your well system exhibits is a clue.
This table matches common symptoms to their most likely causes, helping you focus your diagnostic efforts.
| Symptom | Most Likely Cause | Quick Test |
|---|---|---|
| No water | Tripped breaker or bad pressure switch | Check electrical panel |
| Low pressure | Waterlogged tank or system leaks | "Rock test" on pressure tank |
| Constant running | Tank bladder failure or a system leak | Main water shutoff test |
| Short cycling | Ruptured bladder or undersized tank | Check Schrader valve on tank |
| Sediment in water | Well screen damage or pump too low | Professional inspection needed |
| Air sputtering | Cracked pipes or low water table | Check static water level |
Ruling Out Electrical and Component Issues
The first place to look is always the electrical panel.
Well pumps use sensitive double-pole breakers that can trip from power surges.
Find the breaker for your well pump.
Sometimes a tripped breaker sits in a middle position, not fully off.
Firmly switch it to the "OFF" position, then back to "ON".
If the breaker trips again immediately, stop.
This indicates a short circuit, likely in the pump motor, and requires a professional.
Next, check the pressure tank and switch.
Try the "rock test" on your pressure tank.
A healthy tank has an air cushion and will move slightly if you push it.
A waterlogged tank is full of water and feels like a solid, immovable boulder.
For a definitive test, check the Schrader valve on top of the tank with a screwdriver.
You should hear a hiss of air.
If water sprays out, the internal bladder has ruptured, a 100% confirmation of failure.
This requires a tank replacement.
A constantly running pump is often tortured by a slow, hidden leak.
A single running toilet can waste up to 200 gallons of water per day.
This forces your pump to work overtime, shortening its lifespan by as much as 50%.
Perform the main shutoff test.
Turn off the main water valve to your house.
If the pump finally shuts off, the leak is somewhere inside your home.
Common Well Pump Problems and Solutions
You are noticing strange symptoms.
Your faucets are sputtering, or the water looks dirty.
These clues point to specific problems you can often solve.
Understanding them saves you from costly guesswork.
Common issues include sediment in the water, air sputtering from faucets, low water pressure, and a pump that runs constantly or cycles rapidly. Each symptom has a distinct root cause, from a damaged well casing to a simple pressure switch malfunction.
Addressing these issues promptly not only restores your water supply but also prevents minor problems from escalating into major system failures.
A well system is a connected set of components.
A failure in one part puts stress on all the others.
Ignoring early warning signs is the fastest way to a complete system breakdown.
Let's break down the most common problems and their solutions.
Pump is Pumping Sediment
If you see sand, silt, or dirt in your water, it is a sign of a problem down in the well.
This could mean the pump is positioned too low, near the bottom of the well, and is drawing up accumulated sediment.
It could also indicate that the well screen or casing is damaged, allowing sediment to enter the well.
Solution: The most immediate fix is to install a whole-house sediment filter.
This protects your plumbing fixtures, appliances, and the pump itself from abrasive damage.
A sediment filter can extend the life of your pump's internal components by over 30%.
For a long-term solution, a professional may need to raise the pump or inspect the well itself for damage.
Pump is Pumping Air
Air sputtering from your faucets is alarming.
It means your pump is drawing in air along with water.
This is most often caused by the water level in your well dropping below the pump's intake.
It can also be caused by a leak in the piping between the pump and the house, especially on the suction side of a jet pump.
Solution: First, check all accessible pipes for leaks.
If no leaks are visible, the well's water level needs to be checked by a professional.
A dropping water table is a serious issue that may require lowering the pump deeper into the well.
Water Pressure is Low
A sudden or gradual drop in water pressure is frustrating.
This problem can stem from several sources.
A clogged sediment filter is a frequent cause.
The pressure switch might be set too low or malfunctioning.
There could also be a blockage in your pipes.
Solution: Start by checking and cleaning or replacing your water filters.
Next, you can inspect the pressure switch settings.
A typical setting is 40/60 PSI.
If adjusting the switch does not help, the problem may be a failing pump or blockage in the plumbing.
Keep in mind that even a 10 PSI drop in pressure can feel like a 25% reduction in flow at the tap.
Pump is Constantly Running or Cycling
A pump that never shuts off is working itself to death.
This is almost always caused by a leak somewhere in the system or a faulty pressure switch that isn't telling the pump to stop.
Short cycling is a related problem where the pump turns on and off very rapidly, sometimes every few seconds.
This is a classic sign of a failed pressure tank bladder.
The tank becomes waterlogged and can no longer store pressurized water, causing the pump to turn on with any small drop in pressure.
This rapid cycling can increase the pump's energy consumption by over 200% and will quickly burn out the motor.
Solution: For a constantly running pump, perform the main shutoff test to locate the leak.
For short cycling, the pressure tank almost certainly needs to be replaced.
REPAIR VS REPLACEMENT & WHAT IT WILL COST
Your pump is old and failing again.
You now face a difficult financial decision.
Should you pay for another repair, or is it time to invest in a completely new system?
A good guideline is the 50-percent rule. If a single repair costs more than half the price of a new replacement system, replacement is usually the smarter long-term investment. You must also consider the pump's age, as most residential pumps have a lifespan of 8-15 years.
This decision isn't just about the immediate cost.
It's about weighing future reliability, energy efficiency, and peace of mind against a short-term fix.
A new pump comes with a warranty and the promise of many years of trouble-free service.
A repaired old pump does not.
Let's look at the factors that should guide your choice.
When to Repair
Repairing your existing pump makes sense in specific situations.
Consider repair if:
- The pump is less than 10 years old. A younger pump likely has significant life left in its core components.
- It's a single component failure. Replacing a faulty pressure switch, capacitor, or control box is far cheaper than replacing the entire system. These repairs typically cost 10-20% of a full replacement.
- You have a good maintenance history. If the system has been well-cared-for, a single failure may just be an anomaly, not a sign of systemic decline.
When to Replace
Replacement becomes the more logical option as the system ages and problems multiply.
Think about replacement if:
- The pump is over 15 years old. It is living on borrowed time.
- You are experiencing multiple failures. When the pressure switch fails, then the tank, it's often a sign that the pump motor is next. This is called cascading failure.
- The motor has burned out. Attempting to rebuild a burned-out submersible motor is rarely successful or cost-effective.
- You want better efficiency. A new, energy-efficient pump system can reduce your well's electricity consumption by 25-40%, offering significant long-term savings.
Calculating the True Cost
The upfront price tag is only part of the story.
This table helps compare the true, long-term value of repairing versus replacing.
| Factor | Repair | Replacement |
|---|---|---|
| Upfront Cost | Lower (e.g., $300 - $800) | Higher (e.g., $1,500 - $4,000+) |
| Lifespan Extension | 1-3 years (estimated) | 8-15+ years |
| Energy Efficiency | No improvement | 25-40% potential savings |
| Warranty | Part-specific (often 90 days) | Full system (1-5 years) |
| Future Reliability | Low (risk of another failure) | High |
Remember to account for hidden costs.
A replacement may require electrical upgrades or well cleaning.
However, multiple repair calls also have hidden costs, including lost time from work and the ongoing frustration of an unreliable water supply.
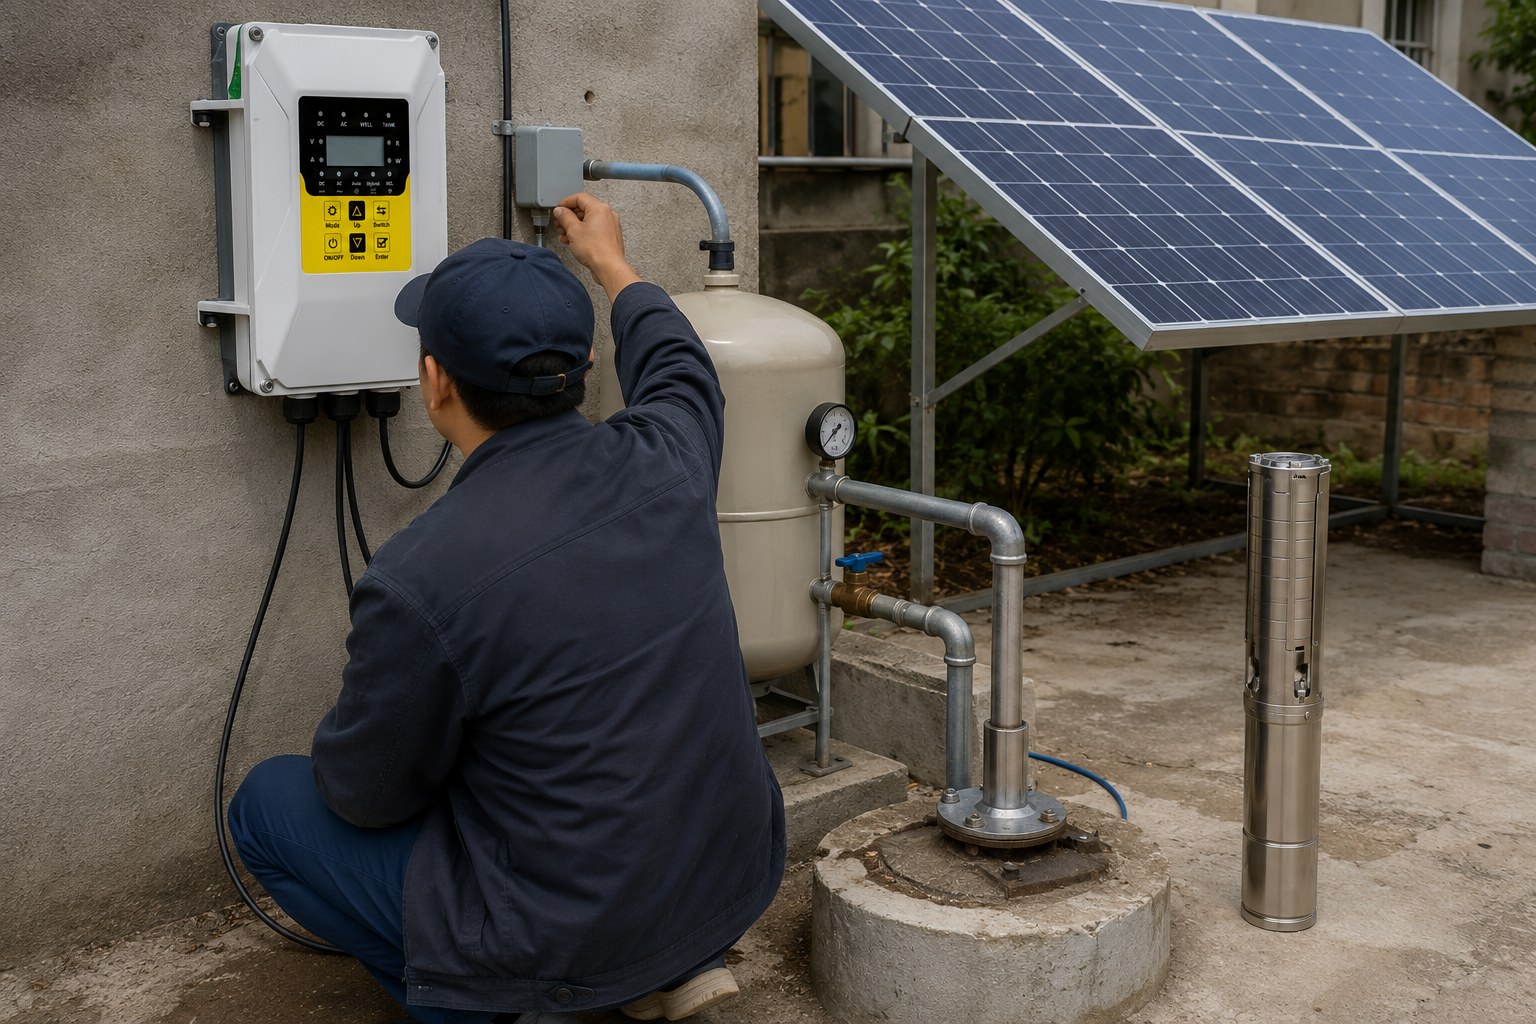
The Core Technology Driving Modern Water Pumps
You have decided to replace your pump.
The market offers a confusing array of choices.
To make a wise investment, you must look past the pump casing and understand the core technology that powers it.
The heart of any modern, high-performance water pump is its motor. High-efficiency Brushless DC (BLDC) permanent magnet motors now achieve over 90% efficiency. This core technology defines the performance, reliability, and lifetime operating cost of the entire system.
The shift from older AC induction motors to advanced BLDC technology is a game-changer.
It is similar to the evolution from traditional light bulbs to LEDs.
The principles are different, and the results in efficiency and longevity are dramatically better.
For anyone purchasing a new pump system, especially for off-grid or solar applications, understanding this motor technology is not optional; it's essential.
The Power of the BLDC Motor
BLDC motors represent a significant leap in engineering.
They use powerful permanent magnets on the rotor, typically made of high-grade Neodymium iron boron.
Because they are electronically commutated, they do not have brushes that wear out, which eliminates a common failure point and makes them virtually maintenance-free.
The technical advantages are substantial.
These motors are up to 47% smaller and 39% lighter than traditional motors of equivalent power.
They deliver high torque across a wide speed range, making them highly responsive.
Most importantly, their efficiency of over 90% means that more of the input energy is converted into water flow, not wasted as heat.
This efficiency directly reduces the number of solar panels needed for a solar pump system by up to 30%, a massive impact on the total upfront system cost.
Matching the Pump Type to Your Needs
The efficient BLDC motor can drive several different types of pump ends.
Each is designed for a specific application.
Choosing the right one is critical for performance and longevity.
| Pump Type | Key Feature | Best Application | Ideal For |
|---|---|---|---|
| Solar Screw Pump | Low Flow, High Head | Deep wells, domestic use, livestock | Water-scarce regions with deep wells |
| Solar Plastic Impeller Pump | High Flow, Wear-Resistant | Farm irrigation, pasture water supply | General use with moderate sand content |
| Solar Stainless Steel Impeller | High Flow, Corrosion-Resistant | Corrosive or acidic water, high-end homes | Coastal areas, regions with poor water quality |
This product portfolio strategy allows distributors to meet diverse market demands.
A screw pump provides high-pressure water from a very deep well.
A plastic impeller pump delivers large volumes of water for agriculture.
A stainless steel impeller pump ensures durability in harsh water conditions.
All are powered by the same ultra-efficient motor technology.
Ensuring 24/7 Water with Hybrid Pumping Solutions
Solar power is a fantastic, free energy source.
But what happens on cloudy days?
What if you need water at night?
A water supply that depends entirely on sunshine is not a reliable solution for many households and businesses.
Modern systems solve this critical challenge with AC/DC hybrid controllers. These intelligent devices can draw power from solar panels when the sun is out, and automatically switch to a grid (AC) or generator backup when solar energy is unavailable.
This hybrid technology provides the best of both worlds.
You get the cost savings and environmental benefits of solar power.
You also get the 24/7 reliability of a conventional grid-powered pump.
It eliminates the "range anxiety" associated with purely solar-powered systems, making them a practical solution for a much wider range of applications.
How Hybrid Controllers Work
The genius of a hybrid controller lies in its automatic and seamless operation.
It has two power inputs: one for DC power from the photovoltaic (PV) solar panels, and one for AC power from the grid or a generator.
The controller's internal logic constantly monitors the available solar power and manages the energy source without any manual intervention.
The process is simple and effective:
- Full Sun: During peak daylight hours, the system runs 100% on free energy from the solar panels. The AC input is on standby.
- Partial Sun or High Demand: If clouds reduce solar input or water demand is very high, the controller's hybrid function blends power from both sources. It uses as much solar power as possible and supplements it with just enough AC power to meet the demand. This maximizes the use of free solar energy.
- No Sun (Night/Overcast): When there is no usable photovoltaic input, the controller automatically and instantly switches over to the AC power source. The pump continues to operate at full capacity, ensuring an uninterrupted water supply.
This technology can increase the effective operational time of a solar pumping system from an average of 6-8 hours a day to a full 24 hours.
This represents a 200-300% increase in utility and peace of mind for the end user.
For distributors, it transforms the solar pump from a niche product into a mainstream, premium water solution.
Conclusion
Troubleshooting your water pump often begins with a simple, free reset.
For lasting reliability and efficiency, however, the real solution lies in understanding modern technology.
Advanced motors and hybrid controls provide the best path forward.
Frequently Asked Questions
Why does my well pump keep losing pressure?
This is usually caused by a waterlogged pressure tank, a leak in your plumbing system, or a worn-out pump.
The pressure tank is the most common culprit.
How much does it cost to reset a well pump?
Resetting the pump yourself costs nothing.
If a professional is needed for a service call and diagnosis, the cost can range from $100 to $300.
Can a well pump be reset?
Yes, pumps with a low-water cutoff switch have a manual reset lever.
You can use it to restart the pump after it has shut off for safety reasons.
What happens if a well pump runs without water?
Running dry causes the motor to overheat and burn out, often in minutes.
This is a catastrophic failure that requires a complete and expensive pump replacement.
How do I know if my well pump motor is bad?
Signs include a breaker that trips instantly, a loud humming noise with no water flow, or an electrical test showing an abnormal resistance reading.
How long should a well pump run each time?
A properly sized pump should run for at least one to two minutes per cycle.
Cycles shorter than 30 seconds, known as short cycling, indicate a bad pressure tank.
Why did my well pump suddenly stop working?
The most common cause, accounting for about 60% of cases, is a tripped circuit breaker.
Other frequent causes are a failed pressure switch or a local power outage.