Your pump isn't working, and every minute of downtime costs you money.
You need to identify the problem quickly to get your operations back on track.
This is a stressful and potentially expensive situation.
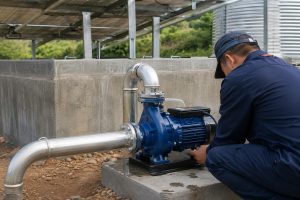
To detect pump failure, start by listening for unusual noises like rattling, which can indicate cavitation or bearing failure.
Check for visible leaks around seals and gaskets.
Monitor for reduced flow, pressure drops, or motor overheating, as these are clear signs of a problem.
Diagnosing a pump issue can feel overwhelming.
The symptoms often overlap, making it difficult to pinpoint the root cause.
Is it a simple clog, or is it a sign of catastrophic internal damage?
Understanding the common failure modes is the first step toward a fast and effective solution.
It allows you to move from reactive panic to proactive problem-solving.
Let's break down the most frequent pump problems and how you can identify and correct them.
What Causes Abnormal Flow and Pressure Drops?
Your pump is taking longer to do the same job.
The flow seems weak, and productivity is suffering.
This inefficiency directly impacts your bottom line and can signal a more severe underlying issue.
Abnormal flow is often caused by a blockage in the suction or discharge line, a damaged impeller, or an internal air leak.
You can diagnose it by measuring the suction vacuum and discharge pressure and comparing these readings to the pump's initial performance data.
A drop in your pump's performance is a clear signal that something is wrong.
A flow rate decrease of just 10-15% can significantly extend operational times and increase energy consumption.
The key is to use data, not guesswork, to find the source of the problem.
By systematically checking key indicators, you can quickly move from diagnosis to resolution.
Reading the Gauges: Your First Clue
The most effective way to start your diagnosis is by checking the pressure gauges.
Gauges should be installed two to four pipe diameters away from the pump for accurate readings.
Compare the current readings to the ones taken when the pump was first installed.
A significant deviation is your first concrete clue.
For instance, a higher-than-normal discharge pressure often points to a downstream obstruction.
This could be a closed valve or a clog in the discharge line.
Conversely, a low discharge pressure combined with a high suction vacuum might suggest a blocked suction line.
Common Culprits Behind Sluggish Operation
If the gauges point to a suction-side issue, several culprits could be at play.
A collapsed suction hose lining can create a major restriction, starving the pump of fluid.
A leaking gasket or a loose pipe fitting can allow air to enter the system, which disrupts the flow.
The suction line itself could be plugged with debris.
These issues all prevent the pump from drawing in liquid efficiently, resulting in a visible decrease in output.
A simple visual inspection of the suction hose and fittings can often reveal the problem.
| Reading | Possible Cause | Recommended Action |
|---|---|---|
| High Discharge Pressure | Blocked discharge line, closed valve | Inspect and clear the discharge line and all valves. |
| High Suction Vacuum | Clogged suction line or strainer | Clean the suction line and strainer. Check for collapsed hose. |
| Low Discharge Pressure | Worn impeller, internal leak, air in system | Inspect impeller for wear. Check for air leaks. Perform shut-off test. |
| Fluctuating Readings | Air entering the suction line, cavitation | Check for air leaks. Inspect suction conditions. |
The Impeller's Role in Flow Performance
If the lines are clear, the problem may be internal.
The impeller is the heart of the pump, responsible for moving the fluid.
Damage or wear to the impeller directly reduces flow and pressure.
Abrasive materials like sand can quickly erode the impeller vanes.
This erosion widens the clearance between the impeller and the pump casing, allowing fluid to recirculate internally instead of being discharged.
This results in a significant loss of efficiency, often exceeding 20-30%.
In some applications, using a pump with a wear-resistant plastic impeller can be a cost-effective solution for handling fine sand.
For more corrosive or abrasive conditions, a more robust SS304 stainless steel impeller provides superior durability and a longer service life, maintaining performance for far longer.
Why is My Pump So Noisy?
A new, strange noise is coming from your pump.
It's loud, distracting, and a sure sign that something is wrong.
Ignoring it could lead to a sudden, catastrophic failure that brings your entire operation to a halt.
A noisy pump is typically caused by either cavitation (a hydraulic issue) or failing bearings (a mechanical issue).
A rattling sound like "rocks in a can" points to cavitation, while a grinding or screeching noise suggests a bearing problem.
Pump noise is a direct communication of distress.
Each type of sound tells a different story about what's happening inside.
Learning to distinguish between these sounds is a critical diagnostic skill.
To start, try running the pump for a few moments without water, if possible.
If the noise disappears, the problem is hydraulic.
If it remains, it is mechanical.
This simple test can cut your diagnostic time in half.
Identifying Hydraulic Noise: The Sound of Cavitation
The most common and destructive hydraulic noise is cavitation.
It occurs when the pressure at the pump inlet drops so low that the liquid begins to vaporize, forming tiny bubbles.
As these bubbles move into a higher-pressure zone within the pump, they implode violently.
These implosions act like tiny hammer blows on the impeller surface, chipping away material and creating a distinct "rocks in a can" sound.
This process can reduce pump efficiency by up to 25% and destroy an impeller in a matter of weeks.
Common causes include a suction lift that is too high, an undersized or clogged suction line, or running the pump too far off its best efficiency point (BEP).
Identifying Mechanical Noise: Bearing Failure
Mechanical noise is most often due to failing bearings.
Bearings support the pump shaft, allowing it to rotate smoothly.
When they begin to fail, they produce a high-pitched squealing or a low-pitched rumbling and grinding.
This is often caused by improper lubrication—either too little, too much, or the wrong type.
Contamination from water or dirt can also wash out the grease and destroy the bearings.
A misaligned shaft places enormous stress on the bearings, leading to premature failure.
As bearings wear, they allow the shaft to wobble, which can cause the impeller to rub against the casing, leading to further damage.
Vibration analysis can detect bearing wear long before it becomes audible, with warning signs appearing when vibration increases by more than 50% from its baseline.
| Symptom | Cavitation (Hydraulic) | Bearing Failure (Mechanical) |
|---|---|---|
| Sound | Rattling, like gravel or rocks | Grinding, rumbling, or high-pitched squeal |
| Vibration | High-frequency, erratic | Consistent, increases with pump speed |
| Performance | Loss of flow and pressure, fluctuating readings | May run normally until seizure, potential overheating |
| Diagnosis | Noise disappears when water is removed | Noise persists when water is removed |
The Importance of Proper Pump Selection
Many noise issues, especially cavitation, stem from a mismatch between the pump and the application.
Every pump is designed to operate within a specific range of flow and head.
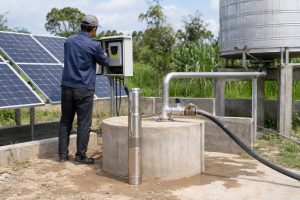
For example, a solar screw pump is designed for low flow and very high head, making it ideal for deep wells.
Attempting to use it in a high-flow, low-head application would force it to operate far from its BEP, likely causing noise and damage.
Conversely, using a high-flow plastic impeller pump in a deep well where a high head is required would lead to poor performance and high energy consumption.
Matching the pump type to the system requirements is the most effective way to prevent noise and ensure a long, efficient service life.
How to Stop Frequent Clogging in Your Pump?
Your pump keeps getting clogged with debris.
You're constantly stopping work to clear the suction line or strainer.
This repetitive downtime is frustrating, time-consuming, and a major bottleneck in your productivity.
Frequent clogging is usually caused by an incorrectly sized strainer, improper positioning of the suction intake, or excessive clearance between the impeller and the pump casing.
Ensure the strainer mesh is correct for the application and position the intake above any sediment.
A pump that clogs frequently is a clear sign that its intake setup is not suited for the environment.
The solution isn't just to clear the clog, but to prevent it from happening again.
This requires a careful look at the entire suction side of your system.
A few small adjustments can transform a constantly problematic pump into a reliable workhorse.
This proactive approach saves countless hours of maintenance and protects the pump from the strain of running blocked.
The Strainer: Your First Line of Defense
The strainer is the gatekeeper of your pump system, but it's often a source of problems.
The mesh size is critical.
If the mesh is too fine, it will trap debris too quickly and clog constantly.
If it's too coarse, it will allow solids to pass through that can damage or clog the pump's internal components.
A general rule is that the strainer's open area should be at least three to four times the area of the suction pipe to ensure unrestricted flow.
The material of the strainer is also important, especially in corrosive environments where a stainless steel strainer will outlast a standard steel one.
Maintaining Proper Positioning and Clearance
Where the suction intake is placed is just as important as the strainer itself.
If the strainer is sitting on the bottom of a pit or sump, it will inevitably get buried in mud and sludge.
This will plug the suction side and starve the pump.
The intake should always be positioned well above the sediment level.
Using a float to suspend the suction hose is an excellent way to ensure it always draws cleaner water from near the surface.
Internally, the clearance between the impeller and the pump casing (or wear plate) is also a factor.
If this "face clearance" is too wide, solids can get wedged in the gap, causing a blockage and reducing efficiency.
Checking and adjusting this clearance to the manufacturer's specification can reduce clogging by over 50% in solids-handling applications.
Advanced Solutions for Challenging Environments
In some environments, like those with heavy slurry or thick mud, a standard setup is simply not enough.
For these challenging jobs, you need more advanced solutions.
- Self-Cleaning Strainers: These systems use a portion of the pump's discharge flow or a separate mechanism to periodically flush debris away from the strainer screen, ensuring a clear intake.
- Floating Suction Systems: These are specifically designed to keep the pump intake just below the surface of the liquid, away from both floating debris on top and sludge at the bottom.
- Chopper or Grinder Pumps: For wastewater and similar applications, these pumps have a cutting mechanism at the inlet that macerates solids before they enter the pump, effectively eliminating the risk of clogging from fibrous materials.
Choosing the right pump type is also a key strategy.
For instance, a solar screw pump, with its unique progressing cavity design, is highly resistant to sand and can handle water with a higher solids content than many centrifugal pumps, making it a superior choice in silty wells.
What Makes a Pump Overheat?
Your pump is hot to the touch.
You might even smell a faint burning odor.
An overheating pump is a serious warning sign that can lead to rapid failure, motor burnout, and even a safety hazard.
Pump overheating is almost always caused by a restriction of liquid flow into or out of the pump.
It can also be due to running the pump dry, improper impeller clearance causing friction, or an overloaded and inefficient motor.
Heat is the enemy of any mechanical system.
In a pump, the liquid being moved is also its primary source of cooling.
When that flow is reduced or stopped, temperatures can rise dramatically.
An increase of just 20°C above the normal operating temperature can cut the life of motor windings and bearings in half.
If you find a pump is hot, never open it.
Shut it down immediately and wait for it to cool completely before investigating.
Flow Restriction: The Primary Cause
The most common reason a pump overheats is insufficient flow.
This "dead-heading" condition occurs when the pump is running but cannot discharge liquid.
This could be due to a closed valve, a clogged strainer, or a blockage in the discharge pipe.
The energy that would normally go into moving the liquid is converted directly into heat, causing the trapped liquid in the pump casing to boil.
This can rapidly damage seals, bearings, and the impeller.
Always verify that the suction and discharge valves are fully open and that all lines are clear.
Even a partially clogged strainer can reduce flow enough to cause a gradual rise in temperature.
The Risk of Running Dry
Running a pump without liquid is one of the fastest ways to destroy it.
The liquid lubricates and cools critical components like the mechanical seal and bearings.
Without it, friction causes temperatures to spike almost instantly.
A mechanical seal can be destroyed in under a minute of dry running.
Bearings will quickly follow.
This is why many systems incorporate dry-run protection sensors that automatically shut down the pump if they detect a lack of water.
In circulating systems, ensure that any bypass lines or check valves are functioning correctly to prevent a section of the system from becoming isolated and trapping heat.
The Power of High-Efficiency Motors
The pump's motor is another potential source of heat.
An overloaded or inefficient motor has to work harder, generating more waste heat.
This is a common problem with older, standard induction motors.
Modern pump systems are increasingly using advanced motors to combat this.
High-efficiency BLDC (Brushless DC) permanent magnet motors are a prime example.
These motors can achieve efficiencies exceeding 90%, compared to 60-70% for many conventional motors.
This means less electrical energy is wasted as heat, allowing the motor to run significantly cooler.
They are also more powerful for their size; a BLDC motor can be up to 47% smaller and 39% lighter than a traditional motor with the same output, simplifying installation.
| Motor Type | Typical Efficiency | Heat Generation | Size & Weight |
|---|---|---|---|
| Standard AC Induction Motor | 60% - 75% | High | Standard |
| High-Efficiency AC Motor | 75% - 85% | Medium | Standard |
| BLDC Permanent Magnet Motor | > 90% | Low | Up to 47% smaller, 39% lighter |
This superior efficiency not only prevents overheating but also reduces energy costs, making BLDC motors a core component in modern, sustainable pumping solutions like solar water pumps.
How Do I Find and Fix Leaks?
You've noticed a puddle under your pump or a hissing sound from a fitting.
Leaks, whether of water or air, are a direct drain on your pump's performance and your budget.
A fluid leak can create safety hazards, while an air leak can stop your pump from working at all.
To find and fix leaks, start by visually inspecting all gaskets, seals, and hose connections for drips or residue.
Use a vacuum gauge to test the suction line for air leaks; the gauge reading should hold steady after shutdown if the line is airtight.
Leaks are more than just a minor annoyance.
A seal leaking at just one drop per second can waste over 400 gallons of fluid per year.
An air leak on the suction side can reduce pump efficiency by over 50% or prevent it from priming altogether.
Addressing leaks proactively protects your equipment, improves performance, and ensures a safer working environment.
Detecting and Sealing Air Leaks
Air leaks on the suction side of the pump are particularly damaging.
They prevent the pump from creating the necessary vacuum to lift water and can cause a loss of prime.
The best way to test for them is with a vacuum gauge installed on the suction line.
Seal the gauge threads with pipe dope to ensure an accurate reading.
Start the pump and then shut it down.
The vacuum gauge reading should hold steady.
If the reading quickly drops to zero, it means atmospheric pressure is entering the suction pipe somewhere.
Check all pipe plugs, fittings, and the suction hose itself.
A common culprit is a worn suction flap valve that is no longer sealing properly.
Replace any worn hoses or leaky seals immediately.
Preventing Seal and Gasket Failure
Mechanical seals and gaskets are designed to wear over time, but their lifespan can be drastically shortened by a number of factors.
Improper installation is a leading cause of premature seal failure.
Even a small error in setting the seal or tightening a gasket can create a leak path.
Always follow the manufacturer's specifications exactly.
Shaft misalignment and vibration also place huge stress on seals, causing them to wear out rapidly.
Using laser alignment tools can improve accuracy by over 70% compared to traditional methods.
This precision is crucial for extending seal and bearing life.
Material Compatibility is Key
The materials of your seals and gaskets must be compatible with the fluid you are pumping.
Pumping an aggressive chemical with a standard EPDM or Buna-N seal will cause it to swell, harden, or dissolve, leading to a catastrophic failure.
This can result in hazardous spills and costly downtime.
When selecting a pump or replacement parts, always verify that the wetted components are chemically compatible with the fluid's composition, temperature, and pressure.
For example, when pumping corrosive water, a pump with SS304 stainless steel components and appropriate seals is essential.
While the initial cost may be higher, the investment pays for itself through increased reliability and service life, preventing failures that could cost ten times as much in cleanup and lost production.
Conclusion
Detecting pump failure early comes down to proactive observation.
By monitoring for changes in flow, noise, and temperature, you can identify issues before they cause major downtime.
Regular maintenance and proper installation are your best defense.
FAQs
What are the first signs of pump failure?
The first signs are often a drop in performance, like lower water pressure, or new sounds like grinding or rattling.
You may also notice the pump motor is hotter than usual.
How do you test a water pump for problems?
Start by checking for power and listening for unusual noises.
Use pressure gauges on the suction and discharge lines to check for blockages or internal wear by comparing to initial readings.
What causes a pump to lose pressure?
A pump can lose pressure due to a worn impeller, air leaks in the suction line, or a clog in the system.
Internal wear is a common cause in older pumps.
Why would a pump suddenly stop working?
A sudden stop is often an electrical issue, like a tripped breaker or a failed motor.
It can also be a mechanical seizure caused by a failed bearing or a major clog.
Can a pump be damaged by running dry?
Yes, running a pump dry is extremely damaging.
It can destroy the mechanical seal and bearings in less than a minute due to friction and overheating.
How often should a pump be serviced?
Service frequency depends on the pump type and usage.
For critical applications, a quarterly inspection is recommended, with a full service annually to check clearances, seals, and bearings.
What is pump cavitation and why is it bad?
Cavitation is the formation and collapse of vapor bubbles inside a pump.
These collapses are violent, causing noise, vibration, and rapid erosion of the impeller, leading to severe damage.
What is the difference between a centrifugal pump and a positive displacement pump?
A centrifugal pump uses a rotating impeller to create flow, with output varying by pressure.
A positive displacement pump, like a screw pump, traps and moves a fixed amount of fluid, delivering a constant flow regardless of pressure.