Struggling with high electricity bills or unreliable water access for your farm or home?
A solar water pump offers a powerful, sustainable solution.
Building a homemade solar water pump involves correctly sizing your system, selecting the right components like panels, a pump, and a controller, and then assembling them.
This guide breaks down the entire process, from calculating costs to final installation, ensuring you build a reliable system.

Embarking on a DIY solar pump project can feel daunting.
You might worry about the high upfront cost or making a mistake in choosing components.
However, the path to water independence and zero-cost energy is clearer than you think.
This article will guide you through every decision, from economic considerations to the final flick of the switch.
We will demystify the technical jargon and provide clear, actionable steps.
Let's start by understanding if a solar water pump is the right financial and practical choice for you.
Economics, Viability & Applications
Is a solar pump really worth the high initial cost?
The long-term savings and incredible reliability might surprise you and change your perspective.
A solar water pump system completely eliminates fuel costs and reliance on an unstable power grid.
With a lifespan of over 20 years for panels and minimal maintenance, the initial investment often pays for itself within 3-5 years through massive electricity savings.
Calculating Your Return on Investment (ROI)
Understanding the financial payback is the first step.
A solar pump system is an investment, not just an expense.
Let's break down how to calculate the return.
The calculation compares the total upfront cost against the money you save every year by not paying for grid electricity.
A typical payback period is surprisingly short.
For example, a small-scale system might have a payback period of just 3.5 years.
After that, the water you pump is virtually free.
| Cost Component | Example Cost (USD) | Description |
|---|---|---|
| Initial Investment | ||
| 2x 400W Solar Panels | $440 | The power source for your system. |
| DC Water Pump | $350 | The heart of the system that moves water. |
| Cabling & Connectors | $50 | To connect all the components safely. |
| Controller/Timer | $75 | Manages power and protects the pump. |
| Total Initial Cost | $915 | |
| Annual Savings | ||
| Old AC Pump Daily Cost | $0.70 | Based on a 1hp pump running 7 hrs/day at $0.13/kWh. |
| Annual AC Pump Cost | $255 | This is your direct annual saving. |
| Payback Period | 3.58 Years | (Total Cost / Annual Savings) |
Agricultural Applications
Solar pumps are a game-changer for agriculture, especially in developing nations.
Farmers often face unreliable power and high connection costs.
A solar pump system provides a stable, independent water source.
This reliability can transform a farm's productivity.
In India, for example, a farmer might pay over $600 just to get an electrical connection to their farm.
Voltage fluctuations then frequently damage expensive AC pumps and inverters.
Power outages can be catastrophic.
Consider a 10-acre cucumber crop.
A single day without water due to a power outage can cause significant weight loss in the harvest.
Since vegetables are sold by weight, this directly translates to a massive loss of income, potentially reducing profits by 15-20% for that harvest cycle.
With a solar pump, a farmer can irrigate consistently.
This allows for planting additional crop cycles outside the traditional monsoon and winter seasons.
One farmer reported being able to plant two extra crops (watermelon and cucumber) in the summer, significantly increasing annual profits by over 40%.
Domestic and Commercial Use
The benefits extend far beyond the farm.
Solar water pumps are becoming a key feature in "Green Buildings."
They provide water for drinking and sanitary uses with a zero-carbon footprint.
This can help a building achieve higher environmental certification ratings.
In residential communities, a single solar pump system can supply the daily water needs for multiple homes.
It ensures water is available even during city-wide power cuts.
This provides a level of security and independence that is increasingly valuable.
Commercial applications are also diverse.
Poultry farms use solar pumps to run cooling systems and provide drinking water for birds.
This improves animal welfare and productivity without adding to the electricity bill.
Choosing Your System: DIY Build vs. Conversion Kit
Should you build a brand-new system from scratch or just convert your existing AC pump?
Each path has its own distinct challenges and unique benefits.
You can build a complete DC solar pump system from individual parts for maximum efficiency, with energy savings of up to 25% over converted systems.
Alternatively, you can use a conversion kit with an inverter to power your existing AC pump with solar, saving on the cost and labor of pulling the pump.
The Full DIY Approach (DC System)
Building a system around a dedicated DC pump is often the most efficient choice.
DC (Direct Current) is the native power produced by solar panels.
Using a DC pump means the power can flow directly from the panels to the pump motor, managed only by a simple controller.
This avoids the energy loss that occurs when converting DC power to AC (Alternating Current).
Advantages of a Full DC System:
- Higher Efficiency: You avoid the 10-20% energy loss typical of inverters, meaning you get more water pumped per watt of solar power.
- Longer Motor Life: Brushless DC (BLDC) motors are incredibly robust. They have an expected lifespan of 20,000 to 30,000 hours. This is 6 to 10 times longer than the 2,000 to 5,000-hour lifespan of a typical brushed AC motor.
- Simplicity: With fewer components (no inverter), there are fewer potential points of failure.
Disadvantages:
- Higher Upfront Cost: You must purchase a new DC pump, which can be a significant part of the budget.
- Installation Labor: If you have an existing submersible pump, you will need to pull it out of the well to replace it.
The Conversion Kit Approach (AC System)
If you already have a functional AC pump, a conversion kit can be an attractive option.
This approach allows you to keep your existing pump in place.
The core of this system is a solar inverter.
The inverter takes the DC power from your solar panels and converts it into AC power that your pump can use.
Advantages of a Conversion Kit:
- Lower Initial Cost: You save the cost of a new pump.
- Easier Installation: All the work is done above ground. You don't need to hire a professional to pull the pump from your well, which can save hundreds of dollars.
Disadvantages:
- Lower Efficiency: The DC-to-AC conversion process is not perfect. The inverter itself consumes power and introduces an efficiency loss of 10-20%. This means you'll need more solar panels to do the same amount of work as a DC system.
- Added Complexity: The inverter is a complex piece of electronics and an additional point of failure in your system.
Key Questions for a Conversion
Before buying a conversion kit, you must confirm compatibility.
You will need to know several details about your existing AC pump.
| Question | Why It Matters |
|---|---|
| 1. What is the HP of your pump? | Higher horsepower pumps require larger, more expensive inverters and more solar panels. |
| 2. How old is the pump? | Older pumps are less efficient and draw more power on startup, requiring the system to be oversized. |
| 3. How many wires does it use? | This determines the type of inverter needed. A 3-wire pump (2 hots + ground) is different from a 2-wire pump. |
| 4. Is it single-phase or three-phase? | The inverter must match the phase of your pump motor. Most residential pumps are single-phase. |
| 5. What is the voltage (110V or 220V)? | The inverter's output voltage must match the pump's required input voltage precisely. |
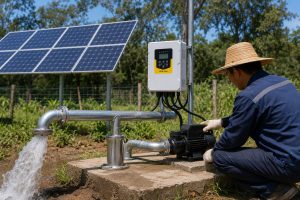
Selecting the Core Components: Panels, Pump, and Controller
Your system is only as strong and reliable as its weakest link.
Choosing high-quality, compatible components is absolutely crucial for performance and long-term durability.
You must select solar panels that meet the pump's power needs, considering your location's peak sun hours.
Then, choose a pump type (like screw or centrifugal) based on your specific requirements for water volume (flow) and pumping height (head).
Finally, a smart controller acts as the brain, maximizing power and protecting your investment.
Sizing Your Solar Panels
The solar panels are your fuel source.
You need to create a solar array that provides enough power for your pump.
Start with the pump's power rating in watts (W) and voltage (V).
For example, a 500W, 48V pump needs an array that can reliably deliver that power.
It's wise to oversize your solar array by about 20-30%.
This ensures the pump runs well even on slightly overcast days and accounts for panel degradation over time.
You can connect panels in series to increase voltage or in parallel to increase current.
For a 48V pump, you could connect two 24V panels in series.
The angle of your panels is also critical.
Using an online calculator to find the optimal angle for your latitude can increase your energy production by up to 25% annually compared to flat-mounted panels.
Understanding Pump Types
Not all pumps are created equal.
The type of pump you choose depends entirely on your water source and needs.
The main factors are "flow rate" (how much water you get) and "head" (how high you can lift it).
A high-efficiency Brushless DC (BLDC) motor is the heart of any modern solar pump, often achieving over 90% efficiency.
This core technology reduces the number of solar panels needed and lowers overall system cost.
| Pump Type | Best For | Common Applications | Pros | Cons |
|---|---|---|---|---|
| Solar Screw Pump | Low Flow, High Head | Deep well domestic water, livestock watering. | Excellent for deep wells (over 100m), highly sand-resistant. | Limited flow rate, not for large-scale irrigation. |
| Plastic Impeller Pump | High Flow, Medium Head | Farm irrigation, garden watering, filling tanks. | High water output, economical, lightweight, good wear resistance. | Less durable in very deep wells or corrosive water. |
| Stainless Steel Impeller Pump | High Flow, High Corrosion Resistance | Corrosive water (acidic/alkaline), high-end homes. | Extremely durable, long service life, high reliability. | Higher cost and weight, more of a premium option. |
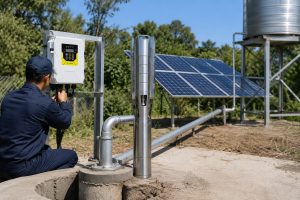
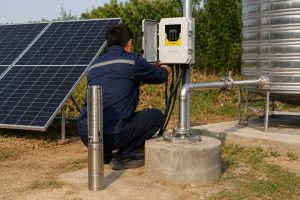
The Brains of the Operation: The Controller
The solar pump controller is arguably the most important component.
It does much more than just turn the pump on and off.
A good controller optimizes and protects your entire system.
The most critical feature is Maximum Power Point Tracking (MPPT).
MPPT technology constantly adjusts the electrical load to find the "sweet spot" where the solar panels produce the absolute most power.
An MPPT controller can boost your water output by up to 30% compared to a system without one.
The controller also provides vital protections.
It prevents the pump from running dry, which can destroy it.
It also manages voltage and current to prevent motor damage.
Some cheap systems suffer from a "cycling glitch," where the pump rapidly turns on and off in low light.
This causes extreme stress on the motor.
A quality controller will have a "soft start" function that ramps up the motor speed slowly, preventing this damaging behavior and extending the life of your pump.
Advanced controllers also offer hybrid functionality, automatically switching to AC grid or generator power when solar is insufficient, ensuring 24/7 water availability.
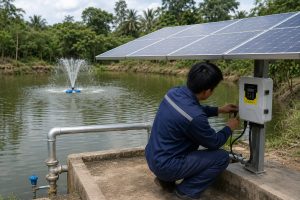
Step-by-Step Assembly and Installation Guide
You have all your carefully selected parts, so now what?
Assembling your solar pump system requires careful planning, basic tools, and a focus on safety.
First, you must build a sturdy, corrosion-proof stand for your panels, angled perfectly to catch the sun.
Next, you will make the critical electrical connections: panels to the controller, and controller to the pump.
Finally, you will install the pump itself and connect the plumbing to bring water where you need it.
Building the Solar Panel Stand
Your solar panels need a solid foundation.
This stand will hold your expensive panels for over 20 years, so it needs to be strong and weather-resistant.
Do not skip this step.
Materials and Preparation:
- Use strong materials like steel I-beams for the posts and C-channels for the framework.
- Before assembly, paint every single metal part with a high-quality anti-corrosion or anti-rust primer.
- After the primer dries, you can add a top coat of colored paint for aesthetics. This two-layer protection is crucial for preventing rust.
Construction:
- Set the main support posts in concrete foundations to ensure they can withstand high winds.
- Use a spirit level to make sure your posts are perfectly vertical.
- Weld or bolt the C-channel framework together. Welding is stronger, but high-grade bolts can also work.
- Set the angle of the panel-holding rails to the optimal angle you calculated for your location. This is the most important part of the stand's design for maximizing power output.
Electrical Wiring and Safety
This is where the system comes to life.
Incorrect wiring is not only dangerous but can also damage your components.
Work slowly and double-check everything.
Safety First:
- Always install circuit breakers. Place one between the solar array and the controller, and another between the controller and the pump. This allows you to safely isolate components for maintenance.
- Ensure your system is properly grounded to prevent electrical shocks.
Connection Process:
- Panels to Controller: Wire your solar panels (in series or parallel as planned) to the PV input terminals on your controller. Pay close attention to the positive (+) and negative (-) polarity. Use a multimeter to verify voltage and polarity before connecting.
- Controller to Pump: Connect the pump's wires to the motor output terminals on the controller. For a 3-phase pump, the wires will be labeled U, V, W.
- Cable Sizing: Use the correct size (gauge) of wire for the distance and current. Undersized cables cause voltage drop, which is lost power. A 5% voltage drop can result in a 10% loss of pump performance. Use an online voltage drop calculator to determine the right cable size.
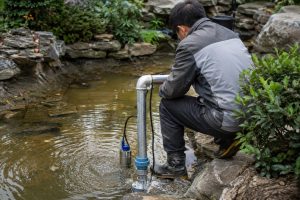
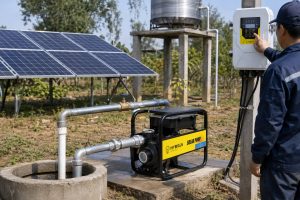
Pump and Plumbing Installation
The final step is getting the pump in the water and connecting the pipes.
For a submersible pump, the process requires care.
- Prepare the Pump: Securely attach the waterproof electrical cable and a strong safety rope to the pump. The rope is not for lifting; it's to prevent you from losing the pump in the well if the pipe ever breaks.
- Lower the Pump: Carefully lower the pump into the well or borehole. Make sure it doesn't get snagged on the sides.
- Connect the Pipe: Attach the output pipe (e.g., poly pipe) to the pump outlet. Use high-quality clamps to ensure a secure, leak-proof connection.
- Finalize Connections: Secure the pipe and safety rope at the top of the well. Connect the pump's electrical cable to the wire leading to your controller. Make sure this connection is waterproof.
Once everything is connected, you can turn on the circuit breakers and watch your system start pumping water using only the power of the sun.
Conclusion
A well-planned solar pump provides water independence, saves money, and is environmentally friendly.
Success depends on matching quality components to your specific water needs and assembling them correctly.
FAQs
How many solar panels do I need for a water pump?
This depends on the pump's wattage and your location's daily sun hours.
As a rule of thumb, the total panel wattage should be 1.3 to 1.5 times the pump's wattage.
Can a solar pump run at night?
Not directly from solar panels.
You would need a battery bank or a hybrid controller that can switch to AC grid power or a generator.
How long do solar water pumps last?
The solar panels can last over 25 years.
A quality brushless DC pump motor can run for 10-15 years, or 20,000+ hours, before needing service.
Do solar pumps work on cloudy days?
Yes, but at a reduced flow rate.
Systems with MPPT controllers are much more effective on cloudy days, often boosting output by 20-30%.
What maintenance do solar pumps require?
Maintenance is very low.
You should clean the solar panels periodically and check the pump's intake screen to ensure it is not clogged with debris.
Can I run my existing AC pump on solar?
Yes, this is possible using a solar conversion kit.
The kit includes a special inverter that converts DC power from the panels to AC power for your pump.
What is the difference between a DC and AC solar pump?
DC pumps run directly from solar panels and are more efficient.
AC pumps are standard grid-powered pumps that require an inverter to run on solar, which adds cost and an efficiency loss.
How deep can a solar pump pull water from?
This depends on the pump type.
Solar screw pumps are designed for high "head" and can pump water from depths of over 150 meters (500 feet).