Struggling to get reliable water from your well? Installing a pump seems complex, but with the right guidance, you can ensure a steady, clean water supply for years to come.
Installing a well pump involves preparing your tools and well, assembling the pump with its pipe and wiring, lowering it carefully, and making the final electrical and plumbing connections. This ensures a safe, efficient, and long-lasting water system.
Choosing the right pump and installing it correctly are the two most critical steps in securing your water independence. While the process used to be reserved for expensive contractors, modern kits and components have made DIY installation a reality. However, a successful installation goes beyond just following steps; it requires understanding the components, preparing properly, and knowing how to connect everything for optimal performance and safety. This guide will walk you through the entire process, from selecting your tools to testing the final system, ensuring you have the knowledge to do the job right.
Pre-Installation Preparations: What Do You Need Before You Start?
Facing a new well pump installation can feel overwhelming. Without the right tools and knowledge, you risk costly mistakes, wasted time, and even potential safety hazards.
Proper preparation is the most critical stage of any well pump installation. This involves gathering all necessary tools and materials, understanding the safety precautions, and correctly sizing the pump for your well's depth and water needs.
A successful installation project is 90% preparation and 10% execution. Before a single component enters the well, you must have a clear plan. This means not only having your tools ready but also deeply understanding the environment you're working in. You need to know your well's depth, its static water level, and its recovery rate. These factors determine the size and type of pump you need, preventing issues like over-pumping or premature pump failure. Safety should be your top priority. You will be working with electricity and heavy components, often near an open well. Ensuring the power is completely off and the work area is secure is non-negotiable. This initial phase sets the stage for a smooth, safe, and effective installation that will provide reliable water for years.
Essential Tools and Materials
First, gather your tools.
A successful installation depends on having the right equipment on hand.
You will need a mix of standard and specialized tools.
| Tool Category | Specific Items | Purpose |
|---|---|---|
| Wiring | Wire strippers/crimpers, heat gun/torch, electrical tape | For making waterproof electrical connections. |
| Plumbing | Two adjustable wrenches, Teflon tape, PVC cutter/hacksaw | For creating tight, leak-free pipe connections. |
| General | Screwdrivers (flat & Phillips), measuring tape | For general assembly and measurement. |
You will also need the core equipment for the "downhole" assembly.
This includes the wire, pipe, and rope that form the umbilical cord for your pump.
- Wire Extension: Use 10-3+G wire for depths up to 550 feet. For deeper installations, use 8-3+G wire to minimize voltage drop and improve motor efficiency by up to 15%.
- Pipe: 160 psi-rated black poly pipe is the easiest to work with for depths up to 300 feet. It's flexible and durable.
- Safety Rope: A polypropylene rope is essential. It supports the pump's weight, reducing stress on the pipe and wire connections by over 90%.
Crucial Safety Measures
Safety is paramount.
Always begin by turning off all power at the circuit breaker.
Verify the power is off using a voltage tester before touching any wires.
Wear protective gear, including gloves and eye protection, throughout the process.
Be aware of your surroundings.
Ensure the ground around the wellhead is stable and clear of any tripping hazards.
If you are using a torch or heat gun for wire splices, keep a fire extinguisher nearby as a precaution.
Step-by-Step Installation: Assembling and Lowering Your Pump
You have all your parts, but how do they fit together? A pile of pipes, wires, and fittings can be intimidating, and one wrong connection can lead to system failure.
The key is a methodical assembly process. You'll connect the plumbing, splice the wires, attach the safety rope, and then bundle everything neatly before lowering it into the well.
This stage transforms a collection of individual parts into a single, functional unit. The goal is to create a reliable "umbilical cord" for your pump. Every connection must be secure and waterproof. A loose plumbing fitting can leak, reducing pressure and efficiency. A poor wire splice can fail, leaving you with no water at all. And forgetting to properly secure the safety rope could result in losing your entire pump assembly at the bottom of the well—a costly and difficult problem to fix. Take your time during these steps. Double-check every connection, and make sure the pipe, wire, and rope are neatly taped together every 10-20 feet to prevent tangling as you lower the pump.
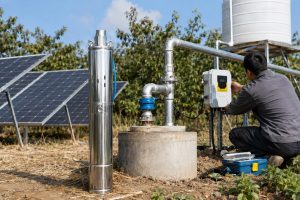
Connecting the Plumbing and Pipe
The first step is attaching the plumbing to the pump's outlet.
This outlet is typically a female pipe thread (FNPT).
You will start by threading a short nipple into the pump outlet.
Then, attach an external check valve.
A check valve is a one-way valve that prevents water from flowing back into the well when the pump turns off, which keeps the system pressurized and reduces pump cycling by up to 40%.
Wrap all threaded connections with 3-4 layers of Teflon tape to ensure a watertight seal.
After the check valve, you will attach a barbed hose adapter.
Push the poly pipe firmly over the barbed end.
Use stainless steel hose clamps to secure the pipe to the fitting, creating a pull-off-proof connection.
For added stability, install torque arrestors on the riser pipe just above the pump.
These devices keep the pump centered in the well casing and absorb the rotational torque the motor generates on startup, protecting the pump cable from abrasion against the casing.
Splicing the Wires
Most submersible pumps come with a short "pigtail" of wire, usually around 6 feet long.
You must extend this to reach the control box above ground.
This requires a permanent, waterproof splice.
Your pump kit should include heat-shrink splice materials.
You will connect the wires from the pump motor to the long submersible cable.
It's critical to stagger the cuts on the individual wires.
This means cutting each of the three conductor wires and the ground wire at slightly different lengths.
Staggering the connections by about 1-2 inches each prevents the final splice from having a large, bulky spot, reducing the risk of it snagging or abrading as it's lowered into the well.
Use a crimper to securely attach the wires, then slide the heat-shrink sleeves over the connections.
Use a heat gun or torch to shrink the sleeves, creating a rugged, waterproof seal that's essential for a long-lasting electrical connection underwater.
Lowering the Pump Assembly
With the plumbing, wiring, and safety rope connected, you have a complete pump assembly.
Tape the wire and safety rope to the poly pipe every 10-20 feet with electrical tape.
This keeps the "umbilical cord" tidy and prevents it from snagging on the well casing.
Now, carefully begin lowering the entire assembly into the well.
This is often a two-person job, especially for deep wells.
One person guides the pump and pipe into the well, while the other helps manage the slack and prevent kinks.
Lower the pump to your desired depth, ensuring it is well below the static water level but at least 5-10 feet off the bottom of the well to avoid sucking up sediment.
Once at the correct depth, secure the safety rope and piping at the wellhead.
Choosing the Right Pump: A Guide to Modern Solar Options
Your old pump failed, or you need a new off-grid water source. But the market is flooded with options. How do you choose the right one without overspending or getting a pump that won't last?
Focus on your specific needs: flow, head (depth), and water quality. Modern solar pumps offer specialized solutions, from high-head screw pumps for deep wells to corrosion-resistant stainless steel models for harsh water.
The pump itself is the heart of your water system. Making the wrong choice can lead to a decade of headaches, while the right choice can provide decades of reliable service. In the past, options were limited. Today, especially in the solar-powered sector, pumps are highly specialized. The global shift towards sustainable energy has driven incredible innovation, resulting in a competitive portfolio of pumps designed for very specific applications. Instead of a one-size-fits-all approach, you can now select a pump perfectly matched to your well's characteristics and your water demands. This not only improves performance but also maximizes efficiency, saving you money on energy costs and extending the life of your entire system.
Solar Screw Pump: For Low Flow, High Head
This pump is a specialist for deep wells.
It uses a simple, robust design: a single stainless steel screw (rotor) rotates inside a rubber housing (stator).
This action traps and pushes "pockets" of water upward through compression.
It's not designed for high volume, but it excels at generating immense pressure.
This allows it to pump water from extreme depths, often exceeding 500 feet.
It's the ideal choice for domestic water supply, filling a storage tank for livestock, or small-scale drip irrigation where high pressure is more important than high flow.
One of its biggest advantages is its high resistance to sand and grit, making it perfect for newly drilled wells or areas with challenging water conditions.
| Feature | Solar Screw Pump |
|---|---|
| Pumping Mechanism | Progressive Cavity (Rotor/Stator) |
| Best For | Very deep wells, high head applications |
| Flow Rate | Low (Typically 1-10 GPM) |
| Head Capability | Very High (Up to 600+ feet) |
| Sand Resistance | Excellent |
| Ideal Application | Domestic water, livestock, deep well irrigation |
Solar Plastic Impeller Pump: For High Flow, General Use
When you need to move a lot of water, this is the pump to choose.
It's a multi-stage centrifugal pump.
This means it has a series of impellers and diffusers stacked on top of each other.
Each stage adds pressure, and the impeller's design determines the flow rate.
These pumps are designed for high-flow, medium-head applications, making them perfect for farm irrigation, flooding pastures, or running a large home garden.
The impellers are made of durable, wear-resistant engineered plastic.
This material provides excellent resistance to abrasion from fine sand, outperforming traditional impellers in many conditions.
They are also lightweight and more economical than their stainless steel counterparts, offering a great balance of performance and value for most agricultural and residential applications.
| Feature | Plastic Impeller Pump |
|---|---|
| Pumping Mechanism | Multi-Stage Centrifugal |
| Best For | High volume, medium depth wells |
| Flow Rate | High (Typically 10-50 GPM) |
| Head Capability | Medium (Up to 400 feet) |
| Sand Resistance | Good (especially for fine sand) |
| Ideal Application | Farm irrigation, pasture water, large gardens |
Solar Stainless Steel Impeller Pump: For Premium Durability
This is the premium option for challenging water environments.
It functions similarly to the plastic impeller pump but uses high-grade SS304 stainless steel for the impellers and pump body.
This construction makes it exceptionally resistant to corrosion.
It is the definitive choice for wells with acidic or alkaline water, which would quickly degrade lesser materials.
These pumps are also built for high reliability and a long service life, often lasting 30-50% longer than other types in harsh conditions.
While the initial cost is higher, it is a wise investment for high-end homes, commercial ranches, or any application in regions with known corrosive groundwater, such as in alkaline soil areas.
The superior durability and reliability provide peace of mind and a lower total cost of ownership over the pump's lifespan.
| Feature | Stainless Steel Impeller Pump |
|---|---|
| Pumping Mechanism | Multi-Stage Centrifugal |
| Best For | Corrosive water, long-term reliability |
| Flow Rate | High (Typically 10-50 GPM) |
| Head Capability | Medium to High (Up to 500 feet) |
| Corrosion Resistance | Excellent |
| Ideal Application | Acidic/alkaline water, high-end homes, coastal areas |
The Power Behind the Pump: Understanding Motors and Controllers
You've chosen the perfect pump, but it's useless without an efficient motor and a smart controller. A poor motor wastes energy, requiring more solar panels and driving up costs.
The secret to a truly efficient solar pump system lies in the motor and controller. A high-efficiency brushless motor and an intelligent MPPT controller can reduce energy needs by over 30%.
Many people focus only on the pump, but the motor is the engine that drives everything. An inefficient motor is like having a leak in your fuel tank; you're constantly losing energy and not getting the performance you paid for. Modern solar pump systems have largely solved this problem with the adoption of Brushless DC (BLDC) permanent magnet motors. These motors are a technological leap forward, offering efficiencies that were unheard of just a decade ago. Paired with a Maximum Power Point Tracking (MPPT) controller, the system intelligently harvests every available watt from your solar panels, ensuring the pump runs faster in bright sun and continues to run even in overcast conditions. This combination is what makes modern solar pumping so reliable and cost-effective.
The BLDC Permanent Magnet Motor Advantage
At the core of every modern solar pump is a BLDC permanent magnet brushless motor.
These motors are a game-changer for off-grid water pumping.
They achieve operating efficiencies exceeding 90%, whereas traditional AC motors often operate at 60-70% efficiency.
This 20-30% efficiency gain is massive.
It means the pump can do more work with less power.
The rotor, the part that spins, is made of high-strength 40SH neodymium iron boron permanent magnets.
This powerful magnetic material allows for a much more compact and powerful motor design.
As a result, these motors are often up to 47% smaller and 39% lighter than older motor designs of the same power rating.
This makes installation easier and less expensive.
The brushless design also means there are no brushes to wear out, making the motor virtually maintenance-free with a significantly longer service life.
Intelligent Control Systems
The controller is the brain of the system.
Its primary job is to manage the power from the solar panels and deliver it to the motor.
The most advanced controllers use Maximum Power Point Tracking (MPPT) technology.
MPPT constantly adjusts the electrical load to find the perfect balance of voltage and current, maximizing the power harvested from the solar panels.
This can boost the pump's output by up to 30% over the course of a day compared to a basic controller.
For even greater reliability, hybrid AC/DC controllers are available.
These innovative controllers have inputs for both solar (DC) and grid/generator (AC) power.
The controller prioritizes solar power, but if sunlight is insufficient (e.g., on cloudy days or at night), it can automatically blend in or switch over to the AC power source.
This ensures a worry-free, 24/7 water supply, combining the free energy of solar with the reliability of a backup power source.
| Controller Type | Power Source | Best Use Case | Key Feature |
|---|---|---|---|
| Standard DC (MPPT) | Solar Panels Only | Standard off-grid solar pumping | Maximizes solar energy harvest (+30%) |
| Hybrid AC/DC (MPPT) | Solar Panels + AC Grid/Generator | Critical water needs, 24/7 operation | Automatic switching between power sources |
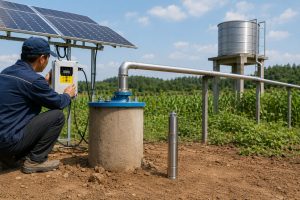
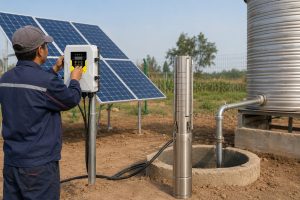
Final Connections: Setting Up Controls and Finishing the Job
The pump is in the well, but you're not done yet. Improperly connecting the controls or failing to seal the well can lead to system failure or contamination of your water source.
The final steps involve sealing the wellhead, wiring the controls, and commissioning the system. This ensures a safe, sealed, and fully automated water system that is protected from the elements.
These finishing touches are what separates a professional installation from an amateur one. Sealing the wellhead is a critical step to protect your water quality, preventing surface runoff, insects, and debris from entering your well. The control box and pressure switch are the brains of the surface operation, automating the pump's function based on demand. Wiring them correctly is essential for both safety and proper operation. Finally, a methodical testing process confirms that every component is working together as designed. Rushing these final steps can undermine all the hard work you've already put in.
Installing the Well Seal or Pitless Adapter
You need to seal the top of your well casing.
This is crucial for preventing contamination.
The method you use depends on your climate.
In areas prone to freezing, a pitless adapter is the best choice.
This device allows you to make the water line connection below the frost line, inside the well casing.
The water pipe then exits the casing underground, directly towards your house, ensuring it never freezes.
A well cap is then used to seal the top of the casing.
In warmer climates where freezing is not a concern, a well seal is used.
This is a specialized cap that creates an airtight seal on top of the casing.
It has ports for the pipe and electrical wiring to pass through while maintaining the seal.
Wiring the Control Box and Pressure Switch
The control box, or starter box, is the hub between your pump and your power source.
For a solar pump, this is the MPPT controller.
Mount the waterproof controller box on a post or wall near the wellhead.
Connect the submersible cable from the pump to the designated terminals in the controller.
Connect the wires from the solar panels to the other set of terminals.
If you are using a pressure tank system, you must also wire in a pressure switch.
The pressure switch is typically installed on a tank tee at the base of the pressure tank.
It is wired between the controller and the pump.
When the pressure in the tank drops below a set point (e.g., 40 psi), the switch turns the pump on.
When the tank is full and the pressure reaches the high set point (e.g., 60 psi), it turns the pump off.
This automates the system and prevents the pump from running constantly.
Testing the System
This is the final and most rewarding step.
Once all connections are made, it's time to activate the system.
Turn on the power from the circuit breaker or solar panels.
The pump should start and you should see the pressure gauge on your tank tee begin to rise.
Listen for the pump's operation; it should run smoothly without any unusual grinding or banging noises.
Check all your plumbing connections from the wellhead to the pressure tank for any leaks.
Open a faucet in the house.
At first, the water may contain some air and sediment.
Let it run until the water is clear.
Observe the pressure switch.
Ensure the pump shuts off at the correct cut-out pressure and turns back on at the correct cut-in pressure.
A successful test confirms your installation is complete.
Conclusion
Proper pump installation is a process of careful preparation, methodical assembly, and smart component selection. A reliable water system depends on matching the right pump, motor, and controller to your specific needs.
FAQs
How long does it take to install a well pump?
A straightforward DIY replacement can take 4-6 hours. A new installation or one with complications may take a full day or require professional help.
Can I replace a well pump myself?
Yes, if you have the right tools, physical strength for lifting, and basic plumbing and electrical skills. For very deep or complex systems, professional help is recommended.
What is the most common reason for well pump failure?
Dry running (pumping without water) is a primary cause. Other common reasons include motor failure from lightning strikes or power surges, and wear on the pump's bearings or impellers.
How do I know what size well pump I need?
Pump sizing depends on your well's depth, the water level, and your required flow rate (gallons per minute). Using an online sizing calculator or consulting a professional is best.
Do I need a check valve on a submersible pump?
Yes, at least one check valve is essential. It is typically installed directly on the pump's discharge to hold pressure in the system and prevent backflow.
How do I protect my pump from running dry?
Many modern controllers have built-in dry-run protection that senses a lack of water and shuts the pump off. You can also install float switches in the well.
What is a torque arrestor and is it necessary?
A torque arrestor is a rubber device that centers the pump in the well and absorbs startup torque. It is highly recommended to prevent the pump's wire from rubbing against the well casing.