Your solar pump is a powerful investment.
But running it without protection can lead to a dry well or an overflowing tank, causing pump damage and wasting precious water.
A simple float switch is the solution.
Connecting a float switch is straightforward. You wire it directly into the designated terminals on your solar pump controller. One switch in your storage tank prevents overflow, while a second switch in your water source, like a well, protects the pump from running dry and burning out.
The basic wiring is simple, but true optimization comes from understanding the relationship between the switch, the controller, and your specific type of solar pump.
This knowledge transforms a simple on/off mechanism into an intelligent, automated water management system that protects your equipment and maximizes efficiency.
Let's explore how to correctly implement this vital component across different solar pumping setups for ultimate reliability.
Understanding the Role of a Float Switch in Your Solar Pump System
You have invested in a modern solar pump system.
But are you actively protecting that investment from its biggest threats?
Without automated control, your pump could run dry or your water tank could overflow.
Both situations can lead to expensive damage and significant waste.
A float switch is an automatic water level sensor. It signals the solar pump controller to turn the pump ON or OFF based on water levels. This core function prevents dry-running damage in the well and stops wasteful overflow in the storage tank, ensuring efficiency and protecting your pump.
A float switch is more than just a convenience.
It is the primary safety mechanism for your entire water pumping operation.
Its role is to automate the decision-making process, removing the need for manual monitoring and intervention.
This automation is what guarantees the long-term health and efficiency of your solar pump.
By understanding its two main functions, you can appreciate why this small device is so critical.
The Two Primary Functions of a Float Switch
A float switch system typically serves two distinct, yet equally important, protective purposes.
-
Tank Full Protection: A float switch is installed near the top of your water storage tank. When the water level rises and lifts the switch, it sends a signal to the controller. The controller then immediately stops the pump. This prevents water from overflowing, which saves water, conserves energy, and prevents potential water damage or erosion around the tank's base.
-
Well Low Protection: A second float switch is placed in the water source (e.g., well, bore, stream). It is positioned above the pump's intake. If the water level drops too low, the switch signals the controller to shut down the pump. This is arguably the most critical function, as it prevents the pump from "running dry."
Why Preventing Dry Running is Essential
Running a pump without water is the single most common cause of catastrophic pump failure.
Water acts as a lubricant and a coolant for the pump's internal components.
Without it, friction and heat build up rapidly.
For a screw pump, this can destroy the rubber stator in minutes.
For a centrifugal pump, it can warp impellers and damage seals.
A low-level float switch provides a nearly foolproof method to prevent this, potentially increasing the operational lifespan of a pump by over 50%.
How a Float Switch Communicates with the Controller
The technology is brilliantly simple.
The float switch contains a small metal ball or contact that moves as the switch tilts.
This movement opens or closes an electrical circuit.
The solar pump controller is designed to detect this change in the circuit.
Modern controllers have dedicated terminals, often labeled "TH" (Tank High) and "WL" (Well Low), specifically for this purpose.
The switch doesn't draw significant power; it merely completes or breaks a low-voltage signal circuit that the controller's logic board interprets.
| Function | Location | Switch Type (Common) | Purpose |
|---|---|---|---|
| Tank Full Stop | Water Storage Tank | Normally Closed (NC) | Opens the circuit when the tank is full to stop the pump. |
| Well Low Stop | Water Source (Well) | Normally Open (NO) | Closes the circuit when the water level is low to stop the pump. |
By installing this simple, automated system, you are ensuring your solar pump operates only when it is safe and necessary to do so.
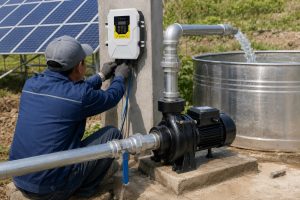
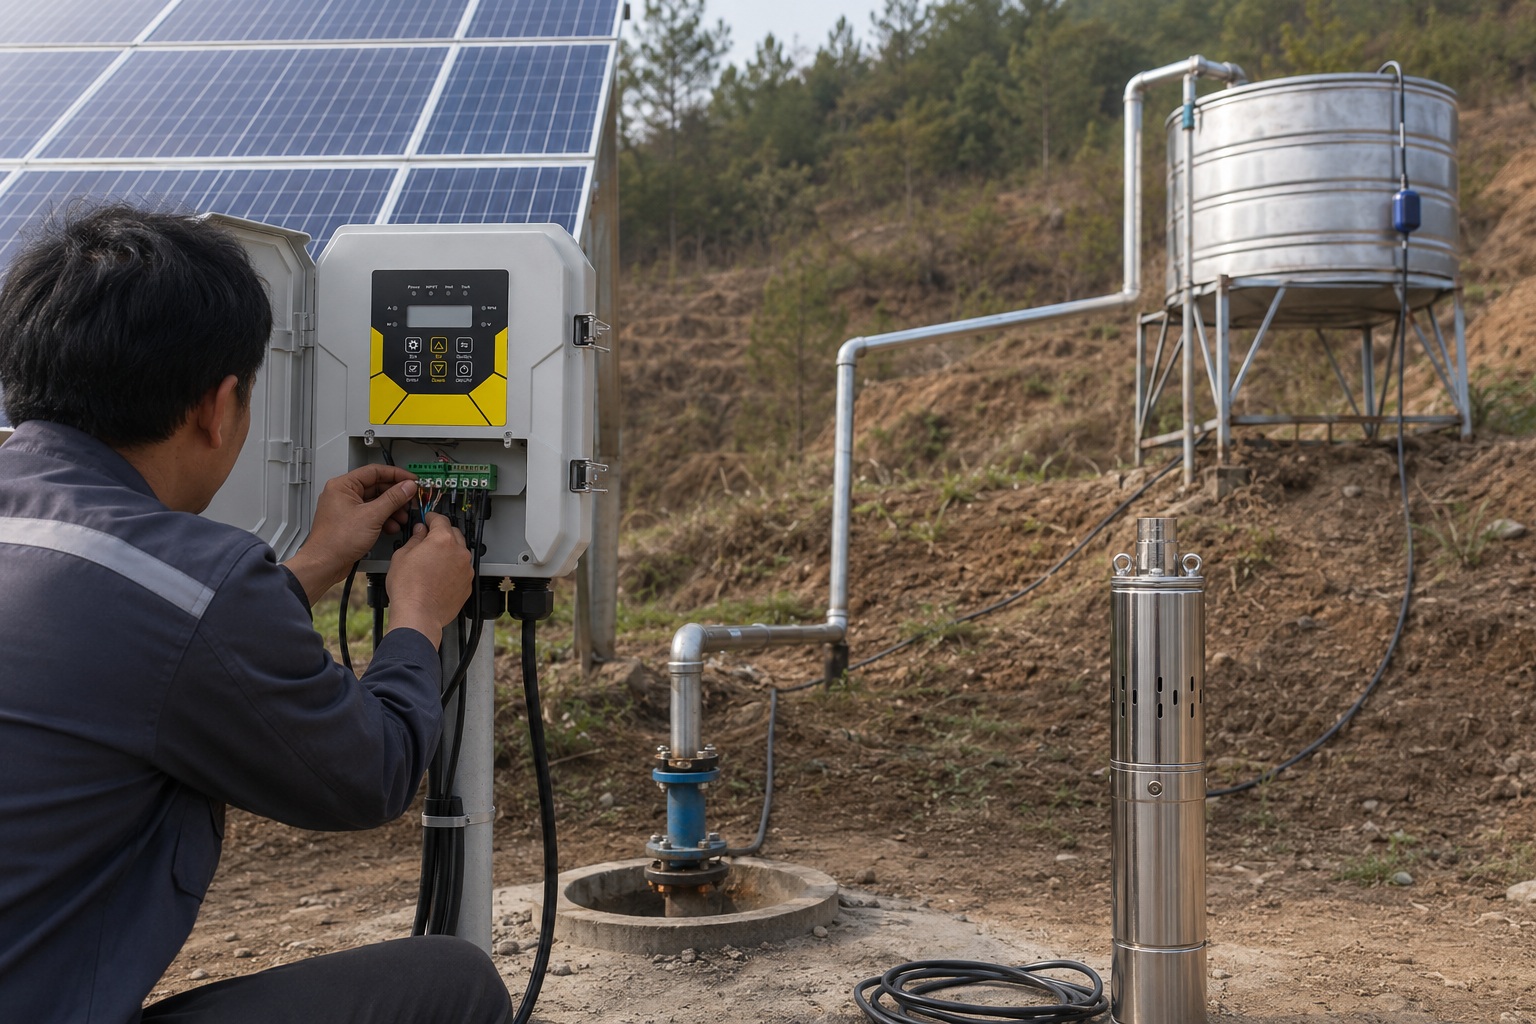
Connecting a Float Switch to a High-Head Solar Screw Pump
Pumping water from a very deep well presents a unique set of challenges.
What happens if your pump runs the well dry hundreds of feet below the surface?
You won't see it happen.
You will only see the massive repair bill for a destroyed pump.
For a solar screw pump, connect the well's low-level float switch to the "Well Low" or "WL" terminals on your controller. Then, connect the tank's high-level float switch to the "Tank High" or "TH" terminals. This dual connection provides complete protection for both the pump and the tank.
Solar screw pumps are specialized tools.
They are the go-to solution for applications requiring high head (the ability to push water very high) but with a lower flow rate.
This makes them ideal for deep boreholes providing domestic water or water for livestock.
Because they operate in such deep and inaccessible environments, protecting them with float switches is not just a good idea—it is absolutely essential.
The Unique Challenge of Deep Wells
Solar screw pumps use a stainless steel rotor that spins inside a rubber stator.
This action creates sealed cavities that move water upward, generating immense pressure.
They are perfect for wells that are hundreds of feet deep.
However, the water level in these deep wells can be unpredictable and is impossible to monitor visually.
A well that seems to have a strong supply can be pumped down faster than it recharges, creating a dry-run condition far underground.
The lubrication provided by water is critical for the rubber stator.
Without it, friction from the spinning rotor can generate intense heat, melting or tearing the stator in less than a minute.
A float switch in the well is the only reliable way to prevent this.
Step-by-Step Connection Guide
Connecting the float switches to your controller is a systematic process.
-
Safety First: Before starting any wiring, ensure the power from both the solar panels and any AC source is completely disconnected from the controller.
-
Identify Terminals: Open your solar pump controller. Locate the block of input terminals. They are typically labeled with clear abbreviations. You are looking for the terminals for the tank float switch (often 'TH' & 'COM') and the well float switch (often 'WL' & 'COM').
-
Wire the Tank Switch: The float switch in your storage tank should be a "Normally Closed" (NC) type. When the tank is full, the switch tilts and the circuit opens. Connect the two wires from this switch to the 'TH' and 'COM' terminals. The polarity does not matter.
-
Wire the Well Switch: The float switch in your well should be a "Normally Open" (NO) type. When the water level drops, the switch hangs vertically, and the circuit closes. Connect the two wires from this switch to the 'WL' and 'COM' terminals.
-
Secure and Test: Close the controller cover securely. Reconnect the power. To test the system, manually lift the tank float switch; the pump should stop. Manually lift the well float switch (if accessible) or check the controller's indicator lights to simulate a low-water condition; the pump should also stop.
Why Screw Pumps Demand Well Protection
The unique design of a screw pump makes it exceptionally vulnerable to dry running.
The tight tolerance between the metal rotor and rubber stator means any operation without water lubrication is destructive.
A simple $20 float switch can reliably prevent a repair that could cost over $500 and require pulling hundreds of feet of pipe out of the ground.
The cost-benefit analysis is overwhelmingly in favor of installing a well-level float switch.
| Pump Characteristic | Implication for Float Switch |
|---|---|
| High Head / Deep Well Use | Visual monitoring of water level is impossible; float switch is mandatory. |
| Low Flow Rate | Less likely to draw down the well quickly, but risk is still present. |
| Rubber Stator Design | Extremely susceptible to damage from dry-run friction and heat. |
| Typical Applications | Domestic and livestock water, where reliability is paramount. |
For any solar screw pump installation, a well float switch should be considered a non-negotiable part of the system.
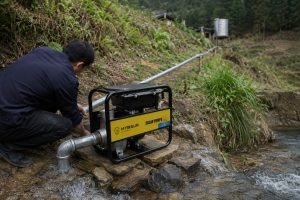
Wiring Float Switches for High-Flow Impeller Pumps
Your high-flow pump is a workhorse.
It can fill a large stock tank or irrigate a field in a fraction of the time.
But this impressive speed brings its own risks.
It can drain your well faster than it recharges or overflow a tank before you have time to react.
For high-flow pumps, whether with plastic or stainless steel impellers, the float switch connection is identical to other systems. Wire a high-level switch in your tank to the "Tank High" terminals and a low-level switch in your well to the "Well Low" terminals for full automation and essential pump protection.
Multi-stage centrifugal pumps, which use either durable plastic or corrosion-resistant stainless steel impellers, are designed for high water output.
They are the preferred choice for applications like farm irrigation, large-scale livestock operations, and filling large reservoirs.
While the float switch connection process remains the same, the reason for the well switch becomes even more critical: managing sustainable water extraction.
Balancing High Flow with Water Availability
An impeller-style pump can deliver over 150% more water flow than a screw pump of a similar power rating.
This is excellent for moving large volumes of water quickly.
However, it also means the pump can easily extract water from a well or bore faster than the source can naturally replenish itself.
This is known as "over-pumping."
A low-level float switch in the well acts as a governor.
It ensures the pump rests when the water level drops, allowing the aquifer time to recover.
This not only protects the pump from dry-running but also promotes sustainable management of your precious water resource.
Choosing the Right Impeller for Your Water
The type of impeller you choose depends on your water quality, but the float switch connection is universal for both.
-
Solar Plastic Impeller Pumps: These pumps are a highly economical and lightweight choice. Their engineered plastic impellers are surprisingly durable and offer excellent resistance to wear from fine sand. They are an ideal, cost-effective solution for general farm and pasture use in regions with good water quality.
-
Solar Stainless Steel Impeller Pumps: This is the premium option. The SS304 stainless steel impeller and pump body are designed for longevity in harsh conditions. They are essential in areas with acidic or alkaline water, which would corrode lesser materials. They provide unmatched reliability and can have a service life over 200% longer than plastic alternatives in corrosive environments.
| Impeller Type | Best For | Key Advantage | Float Switch Importance |
|---|---|---|---|
| Plastic | General irrigation, sandy water | Economical, lightweight | High - Prevents over-pumping of well. |
| Stainless Steel | Corrosive water (acidic/alkaline) | Extreme durability, long life | High - Protects a high-value investment. |
Application-Specific Control
For a high-flow centrifugal pump, the importance of each float switch can depend on the job.
-
For Agricultural Irrigation: The main priority is often protecting the well from being over-pumped. The "Well Low" switch is absolutely critical to ensure the water source remains viable for the entire growing season.
-
For Large Tank Filling / Domestic Supply: In this scenario, both switches are equally vital. The "Well Low" switch protects the pump investment, while the "Tank High" switch prevents massive water waste and ensures the system operates automatically and efficiently.
No matter the impeller type, a dual float switch setup is the professional standard for automating and protecting any high-flow solar pump system.
The Core of the System: The Controller and BLDC Motor
Connecting a float switch involves a simple electrical signal.
But have you ever wondered why the system responds so intelligently and efficiently?
The real magic is not in the switch itself.
It is in the advanced "brains" and powerful "heart" of your modern solar pump system.
The float switch sends a simple signal to the MPPT controller. The controller acts as the brain, processing this signal and then commanding the high-efficiency Brushless DC (BLDC) motor to start or stop. This synergy between controller and motor is what makes the entire system so effective and reliable.
A float switch is merely an input device.
The true performance of your solar pump system hinges on two core components: the Maximum Power Point Tracking (MPPT) controller and the Brushless DC (BLDC) permanent magnet motor.
Understanding how they work together reveals why modern solar pumps are so much more powerful and efficient than older designs.
The Brains: The MPPT Controller
Think of the controller as the pump's central nervous system and mission control.
Its job is far more complex than just reading the float switch.
-
Receiving Commands: It constantly monitors the float switch terminals. When a switch opens or closes the circuit, the controller instantly recognizes the command to stop or start the pump.
-
Maximizing Power: Its primary function is Maximum Power Point Tracking (MPPT). This sophisticated algorithm constantly adjusts the electrical load to extract the absolute maximum amount of power from the solar panels, regardless of sunlight intensity. An MPPT controller can boost power harvest by up to 30% compared to simpler controllers.
-
Motor Management: The controller provides a "soft start" function, gradually ramping up the motor speed. This reduces mechanical stress on the pump and electrical strain on the components, significantly extending the system's life.
The Heart: The BLDC Permanent Magnet Motor
The motor is the powerhouse that does the actual work of moving water.
Virtually all high-quality solar pumps today use BLDC permanent magnet motors for several key reasons.
-
Unmatched Efficiency: BLDC motors achieve electrical efficiencies exceeding 90%. In comparison, traditional AC motors or brushed DC motors often operate in the 60-75% efficiency range. This huge efficiency gain means a BLDC motor can do the same amount of work with significantly less power.
-
Cost and Size Reduction: Because they are so efficient, BLDC motors require fewer solar panels to run. This can reduce the total initial system cost by as much as 25%. They are also physically smaller and lighter (up to 47% smaller and 39% lighter) than older motor types, simplifying transportation and installation.
-
Reliability and Longevity: As the name implies, they are "brushless." There are no brushes to wear out, which was a primary failure point in older DC motors. This makes them virtually maintenance-free with a much longer operational lifespan.
How They Work in Perfect Harmony
The process is a seamless loop of high-tech communication.
- A float switch detects a change in the water level.
- It sends a simple, low-voltage signal to the MPPT controller.
- The controller processes the signal, checks available solar power via its MPPT logic, and makes a decision.
- The controller then sends a precisely managed electrical current to the BLDC motor, telling it to start, stop, or adjust speed.
This integrated system ensures that the pump only runs when it's needed, and when it does run, it operates at the highest possible efficiency.
Advanced Control: What About Cloudy Days or Nighttime Pumping?
Solar pumps are a fantastic, energy-independent solution.
But what happens when you desperately need water and the sun isn't shining?
Your crops, your livestock, and your family can't always wait for a sunny day.
This limitation has been a major challenge for solar pumping.
For guaranteed 24/7 water access, an AC/DC hybrid controller is the ultimate solution. This advanced controller automatically prioritizes solar power but can seamlessly blend in or switch to an AC power source, like the grid or a generator, ensuring your pump runs whenever you need it.
The standard solar pump setup is DC-only, meaning it works only when the sun provides enough power.
For many users, this is perfectly acceptable.
However, for critical applications, the need for water doesn't stop when the sun goes down or hides behind thick clouds.
This is where a hybrid AC/DC system provides a revolutionary advantage, offering the best of both worlds.
Introducing the Hybrid Solar Pump Controller
A hybrid controller is a more advanced version of a standard solar pump controller.
The key difference is that it is designed with two separate power inputs:
- A DC input for your solar panel array.
- An AC input for a 110V or 230V source, such as your utility grid or a backup generator.
The controller's internal logic is programmed to always prioritize the free energy from the sun.
It will only draw power from the AC source when the solar energy is insufficient to meet the pump's needs.
How Hybrid Power Management Works
The process is fully automatic and seamless, requiring no manual switching from the user.
-
In Full Sun: The system operates as a standard solar pump, running 100% on the power generated by the photovoltaic panels. The AC input is dormant.
-
On Partly Cloudy Days: This is where the "hybrid" function shines. If clouds reduce solar power, the controller won't just shut down. It will continue to use all available solar energy and then supplement it by drawing just enough AC power to keep the pump running at the desired speed.
-
At Night or in Heavy Overcast: When there is no significant solar input, the controller automatically switches over to run the pump entirely from the AC power source.
Throughout all of this, your float switches continue to do their job, telling the system when to run.
The hybrid controller simply decides how to power it.
The Overwhelming Benefits of a Hybrid System
Upgrading to a hybrid system offers three transformative advantages.
-
Guaranteed Water Security: You gain a truly uninterrupted water supply, 24 hours a day, 7 days a week. This is a game-changer for critical irrigation, dairy operations, and primary household water.
-
Maximum Energy Savings: Because the system is hard-wired to use solar first, you are still maximizing your use of free energy. It only resorts to paid AC electricity when absolutely necessary, keeping utility bills to a minimum.
-
Elimination of Complex Batteries: Previously, the only way to get 24-hour operation was with a large, expensive, and high-maintenance battery bank. A hybrid system often eliminates the need for batteries entirely, which can reduce total system cost, complexity, and maintenance by 40% or more.
| Feature | Standard DC Controller | AC/DC Hybrid Controller |
|---|---|---|
| Power Source | Solar Only | Solar + Grid/Generator |
| Operating Hours | Daytime Only | 24/7, All Weather |
| Cloudy Day Perf. | Pump stops or slows | Pump maintains speed by blending power |
| Battery Need | Required for night use | Not required for night use |
| Best For | Non-critical water transfer | Critical applications, 24/7 reliability |
For the ultimate in reliability and flexibility, a hybrid AC/DC controller transforms your solar pump from a daytime-only device into a continuous, all-weather water solution.
Conclusion
Connecting a float switch is a simple wiring task.
But it is the single most important step to protect your pump and automate your water system.
Understanding your pump type and advanced controller options, like hybrid AC/DC models, empowers you to build a truly efficient, resilient, and worry-free water solution.
FAQs
What happens if a float switch fails?
If a switch fails in the "off" position, the pump won't run. If it fails in the "on" position, it loses its protective function, risking overflow or dry-running.
Can I use one float switch for both the tank and well?
No, you need two separate switches. One is for the high level in the tank, and the other is for the low level in the well, as they perform different functions.
How long should the float switch cable be?
The cable must be long enough to allow the switch to hang freely and operate correctly at the desired water levels, both high and low, without being strained.
Does a float switch use a lot of power?
No, a float switch uses a negligible amount of power. It only carries a very low-voltage signal to the controller's logic circuit, not the main pump current.
What is the difference between Normally Open (NO) and Normally Closed (NC)?
A NO switch completes a circuit when activated (e.g., well level drops). An NC switch breaks a circuit when activated (e.g., tank becomes full).
Can I add a float switch to any solar pump?
Yes, if it has a modern controller. Nearly all solar pump controllers are designed with dedicated terminals to easily connect tank and well float switches.
Do I need a float switch if my controller has electronic dry run protection?
A float switch is still highly recommended. It is a direct mechanical measurement of the water level and is often more reliable than electronic protection, which can be fooled.
How do you test a float switch?
Simply lift the switch by hand to its "active" position. If connected to a powered controller, it should cause the pump to turn on or off as intended.